Home → Find a cache → Printer Friendly Version
Find a cache
Geocaching is a real-world treasure hunt happening right now, all around you.
There are millions of geocaches worldwide. Geocaches are found in parks, urban areas, forests, deserts, on top of mountains, underwater — pretty much anywhere you can imagine. There are probably a few near you right now…
- 1. Search for caches online
- 2. Find caches in the field
- 3. Log your find online
- 4. Premium member features
1. Search for caches online
1.1. Search for a cache
This article is about functionality of Geocaching.com. For functionality on the Geocaching® app, go here.
If you are a new geocacher, get tips on how to find your first cache.
Geocaching.com has several powerful tools to select caches to find. Use search and map filters to search for geocache types, difficulty and terrain, Favorite points, and more. Premium members can save searches as Lists and access them on web and mobile.
Popular searches
Geocaching.com provides several quick searches on the search page for Traditional Caches, the most Favorited geocaches (Premium feature), or the newest geocaches near you (Premium feature).
Here are some searches to get you started:
All worldwide geocaches
- Go to search.
- Press green magnifying glass icon (next to Filters).
Caches near you
- Set your Home Location.
- Select Home location in the search field.
Most Favorited caches (Premium feature)
Search for a specific cache name (Premium feature)
Caches that have not been found by you or your friends (Premium feature)
- Under Not found by, enter up to ten usernames.
- Under Found status, select Not found by me.
Mystery Caches you have solved (Premium feature)
- Under Geocache type, select Mystery.
- Under Solved coordinates select Solved coordinates only.
Fill your Difficulty and Terrain grid (Premium feature)
- Under Difficulty and Terrain, select Fill in your D/T grid.
1.2. Find the new geocaches near me
Instant Notifications
Use this Premium member feature to receive email notifications for newly published geocaches in that area.
- Save up to ten requests.
- Specify geocache types.
- Specify a radius up to 50 miles from a set of coordinates.
Pocket Queries
Premium members can set up a Pocket Query for geocaches published within the past seven days. Find out how.
Geocache search
Premium members can search for geocaches in an area and sort the results by Placed On to see the newest caches first.
1.3. What is a GeoTour?
Plan your geocaching vacation with GeoTours
GeoTours are collections of geocaches that create self-guided, themed tours around historic sites, parks, cities, and more. GeoTours are often sponsored by local tourism boards, historical associations, or national park services. Local experts pick out the best places to hide new geocaches.
If you find 100 percent of the caches on the GeoTour at that time, you will earn a GeoTour souvenir for your profile, a perhaps even a geocoin or other prizes. Keep in mind that the exact number of caches on a GeoTour may increase or decrease over time.
Check out the lastest GeoTours posts on our blog.
Search for GeoTours with GT codes
Each GeoTour has a unique GeoTour code (GT code). For example, the HQ GeoTour in Seattle, Washington has the code GT29. Find the list of all GT codes listed in the mobile apps.
Enter a GeoTour code (GT code) on the Geocaching® app or use the short-form web address format to find GeoTours on Geoaching.com: coord.info/GT29.
1.4. Cache pages in foreign languages
Most caches are written in the cache owner’s local language. If you are unable to read the cache description:
- Use an online translation tool or app such as Google Translate.
- Search online for bookmark lists written in your native language, such as: bookmarks geocaching.com Paris english language.
- Contact the cache owner and ask if they are able to provide information in your language.
1.5. Attributes
Attributes on the right side of a cache page give additional information at a quick glance. For example, they can indicate that the cache is dog-friendly or has a scenic view. See the full list of attributes.
Tip: Premium members can use search filters on the Geocaching® app and Geocaching.com or generate Pocket Queries to find caches with specific attributes. .
Special attributes
Owner attention requested: Automatically appears when someone reports a problem from the cache page and chooses Owner attention requested. Cache owners must do maintenance to remove it.
Wheelchair accessible: Caches with a terrain rating of 1 must have this attribute.
Wireless beacon: Caches that use a beacon must have this attribute.
UV light required: Caches that have a container or stages that include UV paint must have this attribute.
Geocaching.com solution checker: Automatically appears on Mystery Caches with a solution checker.
Challenge cache: Challenge caches must have this attribute. This attribute is not allowed on other caches.
1.6. Contact a cache owner
On Geocaching.com
There are two methods to contact cache owners on Geocaching.com, Message Center and email.
From a cache page
- Under the cache title, select Message this owner.
- Write your message and (optionally) add a photo.
From a profile page
- Under the cache title, select the username of the cache owner.
- Select Send Email or Send Message.
- Write your message and (optionally) add a photo.
On the Geocaching® app
- Select a cache and open the cache page.
- Under the Placed by information, select Message
- Write your message and (optionally) add a photo.
- Select Send.
1.7. Placed by: Deleted user
According to our Privacy Policy, Geocaching.com users can request that Geocaching HQ deletes all of their personal account information. This personal information includes data like username, friend list, and favorite caches.
If a geocacher who owns geocaches asks to have their data deleted, they must first archive their caches. Geocaching HQ will not delete their cache page(s), but we will remove the username in the “placed by” field. In its place, you will see the following sentence: “A cache by [DELETED_USER]”.
1.8. Geocaching product testing
Geocaching HQ often conducts testing of potential new products and improvements to existing products. We do this in many ways, ranging from personal interviews with geocachers to large-scale online testing.
These tests occur at various stages of a project. They’re extremely important because they help us to discover and fix bugs, learn what geocachers think about new features, and more. Sometimes, a very small percentage of the community is selected to participate in testing — this usually happens in the early stages of a project. Other times, especially when the project is closer to launch, we’ll open it to a much larger number of people.
1.9. Type the degree symbol °
On PC
Alt + 0176
or
Alt + 248
- Hold down the Alt key.
- On the numeric keypad on the right of the keyboard, type 0176 (or 248).
- Release the Alt key.
On Mac OS
Option + Shift + 8
- Hold down the Option key.
- Hold down the Shift key.
- Hold down the 8 key.
- Release all keys.
2. Find caches in the field
2.1. Enter solved coordinates for Mystery Caches
Mystery Caches often involve solving puzzles in order to determine the location of the cache container so they are sometimes referred to as Puzzle Caches. The listed coordinates are often bogus (fake) coordinates where you will not find anything. After you solve a puzzle, you can enter the solved coordinates on Geocaching.com or on the Geocaching® app. Once you enter the solved coordinates, they will automatically sync between the website and app.
Enter solved coordinates on Geocaching.com
- On a Mystery Cache page, click on the pencil icon next to listed coordinates.
- Enter solved coordinates in Change To field.
- Select Submit.
- Select Accept
Enter solved coordinates on the Geocaching® app
- Choose a Mystery Cache and select Waypoints.
- Select Posted Coordinates under Existing Waypoints.
- Select the pencil icon.
- Input new coordinates and select Save.
Automatic sync between web and Geocaching® app
When you have entered solved coordinates, you will see the solved coordinates icon on the Geocaching® app and on Geocaching.com:
Screenshots are from the Geocaching® app on iPhone. It will look slightly different on Android devices.
2.2. Project a waypoint
Sometimes you will need to project a waypoint to find the next stage of a Multi- or Mystery Cache.
Projecting a waypoint involves plotting a second point that lies a certain distance and direction from the first. That direction, provided as an angle in degrees from true north or from magnetic north, is called a bearing.
To project a waypoint from known coordinates in the field, follow these steps:
- At the starting coordinates, determine the desired bearing.
- If you use a magnetic compass, determine if the bearing specifies true north or magnetic north. If the former, make sure to adjust for the magnetic declination at your location.
- If you use a GPS, make sure that the north reference of your device matches the reference specified by the bearing.
- Walk the specified distance in that direction to arrive at the projected coordinates.
Tip: A GPS unit can also record a waypoint at the desired bearing and distance without you needing to walk to the location first.
To calculate a projection online, use a mobile or online tool to calculate the projected coordinates. For example, the Geocaching Toolbox. This tool calculates coordinates for a start point, bearing, and distance.
2.3. True north vs. magnetic north
True north
True north is located at the Geographic North Pole and is based on the Earth’s axis. The Earth rotates along the axis of the geographic north and south poles where the longitude lines converge. Most GPS devices are set to navigate to true north but you can set it to magnetic north.
Magnetic north
Magnetic north is located at a different location than true north and is based on Earth’s magnetic field. The Earth’s mantle spins at a different rate than its liquid core, thus magnetic north shifts up to 25 miles (40 km) each year. A magnetic compass always points towards magnetic north.
Project a waypoint: True vs. magnetic north
Depending on your current location and the distance to your projected waypoint, it will make a difference whether you are using magnetic or true north.
Short distance, small declination
In an area with a magnetic declination of 3 degrees the short distance of 750 ft (229 m) over a bearing of 45° results in a difference of 41 ft (12.5 m). You’ll still be able to find a cache when you arrive at your waypoint.
Long distance, big declination
In an area with a magnetic declination of 16 degrees the long distance of 3 miles (5 km) over a bearing of 45° results in a difference of 0.78 miles (1.2 km). If you navigated to wrong north you would be very far away from the cache you are looking for.
2.4. Geocaching with disabilities
Accessible geocaches
Wheelchair accessible geocaches have:
| A terrain rating of 1. | |
| A Wheelchair accessible attribute. |
Tip: Premium members can create a Pocket Query to automate their searches.
The website Handicaching aims to improve accessibility of geocaching for disabled people. (Note: Geocaching HQ is not affiliated with Handicaching.)
Visually impaired
Different GPS options are available for visually impaired geocachers.
Hearing impaired
Introductory videos on the Geocaching® app feature subtitles with no spoken dialogue.
2.5. Report a geocache
If a geocache has been found placed in an unsuitable location, please let us know.
- If you are law enforcement, call us at 206 971-0544.
- If you are a private citizen or business owner, email us.
Include information to identify the geocache
- Geocache name.
- GC code (GCXXXX).
- Legible photo of the most recent logbook entries.
- Nearest address or coordinates.
Find the coordinates of a location
- Locate the area of the geocache on Google Maps.
- Right-click the location on the map.
- Select What’s here?
- At the bottom, you’ll see a card with the coordinates.
Tip: The more information you can provide, the better.
3. Log your find online
3.1. Log types
This article is about log types for cache finders. Read about log types for cache owners here.
Log types for cache finders:
- Found it
- Didn’t find it
- Write note
- Will attend/Attended (for Event Caches)
- Webcam photo taken (for Webcam Caches)
Found a cache in need of attention or repair? Learn how to log a cache that needs maintenace.
Found it
You can log caches online as "Found" after you visited the coordinates and signed the logbook. You can also add a photo or a Favorite point to your online log.
Please take time to write at least a few sentences when you log your find — this is how you say “thank you” to the cache owner for creating and placing the geocache.
EarthCaches and Virtual Caches have different logging requirements.
Didn't find it
Use a “Didn’t find it” (DNF) log when you look for a cache but do not find it. DNF logs are an important log type — they inform cache owners and other finders that a cache may be extra difficult to find or possibly missing. DNF stands for “Did not find”.
Write note
Use a “Write note” log to add information to a cache. Some examples:
- You previously logged and found the cache, but want to add additional information.
“Revisiting this cache with a friend who hasn’t found it yet!” - You dropped a trackable into a cache previously logged and found.
- This cache is part of a challenge cache, but you haven’t completed all the challenge tasks yet.
Will attend/Attended
For Event Caches log a “Will attend” prior to the Event. Once you have physically attended the Event, choose the log type “Attended” to earn your smiley.
Webcam photo taken
Use a “Webcam photo taken” log after you visit a Webcam Cache. Webcams have different logging requirements than other cache types.
3.2. When a cache needs maintenance
If you find a geocache in need of help (e.g. logbook is full or the container is damaged), post an “Owner attention requested” log.
When you select “Owner attention requested” on Geocaching.com, the system adds an attribute to the page to alert the cache owner and other geocachers that the cache may need attention.
Post an "Owner attention requested" log
On Geocaching.com
- On a cache page, select Log geocache.
- Above the text box, select Owner attention requested.
- Explain the issue in your log text, and post your log.
On the Geocaching® app
- On the cache details page, scroll down to the bottom.
- Select Report a Problem with this geocache.
- Select Owner attention requested or Reviewer attention requested.
- Explain the issue in your log text, and post your log.
Tip: This will not increase your find count. Return to the cache page to compose any other logs about your experience.
When to request owner attention
- Logbook is full
- Container is damaged
- Cache should be archived
- Other
Logbook is full / Container is damaged
Use these options when appropriate.
When to request reviewer attention
Cache should be archived
Cache archival is permanent, so this option is only used under rare circumstances. Consider contacting the cache owner directly with your concerns before selecting this option.
Select this option if:
- Property owners, business owners, or local authorities, or law enforcement expressed concern during your search for the cache.
- Cache placement or searching for the cache damages the area or defaces property.
- You couldn't find a cache, and it has several “Didn’t find it” or “Owner attention requested” logs on the cache page with no cache owner response.
Do not select this option if:
- You didn't find the cache — use a “Didn’t find it” log.
- The cache needs repairs — select the “Owner attention requested” option.
- The cache location seems to be inappropriate — consider contacting the cache owner with your concerns.
- There is no pen in the cache — caches are not required to contain pens.
The cache owner and local geocaching community volunteer reviewer will get notifications and may follow up. The cache will not be archived automatically, and you may not see a public response to your log.
Other
If none of the above describes your concerns, select Other and describe the details in your log.
3.3. Additional logging requirements (ALR)
A geocacher can log a physical cache online as “found” if they have signed the logbook. All other logging requirements are considered additional logging requirements (ALRs) and must be optional.
If you own an existing cache that has a mandatory ALR, you must:
- Edit the text of your cache page to make the ALR optional, or remove it.
- Cache owners must not delete logs based on ALRs. This applies to all logs written since April 4, 2009.
Exception: Challenge caches
Challenge caches published prior to April 2015 are legacy caches and may have ALRs that require further documentation.
Challenge caches published after April 2015 are allowed to have ALRs, signing the log does not require further documentation.
3.4. Add a photo to a log
On Geocaching.com with a new log
- Select Log geocache from a cache page.
- On the log page, drag and drop up to 20 photos to attach to your log.
On Geocaching.com with an existing log
- Find your log on the cache page and select View / Edit Log / Images.
- Select Edit log on the right.
- Choose the image and select Upload or Drag and drop them into the cache text box.
On the Geocaching® app
- From the log screen, select the camera icon.
- Choose a photo from your library or take a new photo.
- Save your log as a Draft or post your log immediately.
3.5. Delete logs from geocache and trackable pages
Geocache and trackable logs can be deleted by the log owner, cache or trackable owner, and Geocaching HQ staff. Deleted logs disappear from the cache page and from the log owner’s profile. They cannot be restored by the cache or trackable owner or log owner.
When you delete a log, the count associated with that log is decreased. However, deleting logs does not affect trackable location or mileage, or any action associated with the log (deleting an archive log does not unarchive a cache page).
To delete a geocache log, follow these steps:
- Go to Your Geocaching Logs on Geocaching.com.
- Select View Log or View / Edit Log / Images.
- On the log page, select the Delete log trashcan.
- Select Yes to confirm.
To delete a trackable log, follow these steps:
- Go to Your Trackable Logs on Geocaching.com.
- Select Visit Log.
- On the log page, select the Delete log trashcan.
3.6. Log an EarthCache or a Virtual Cache
Read the cache page to learn the logging requirements for any EarthCache or Virtual Cache. You must visit an EarthCache site or Virtual Cache in person and, in most cases, answer questions to claim the find. Send your answers by email or Message Center directly to the cache owner. (Note: cache owners cannot require information to be sent through one particular tool.) Once you send your answers, you may log your find online before hearing back from the cache owner.
Find out how to contact a cache owner.
3.7. Format cache and trackable logs
Add a personal touch to your logs with formatting and emojis (smileys). These will show up on the website, but not on the mobile app — you will see the code instead.
Formatting guide
| Style | Code | Result on web |
|---|---|---|
| Bold | **bold** | |
| Italic | *italic* | |
| Quote | >quote | |
| Quote | #_**quote:**_# | |
| Hyperlink | [hyperlink](www.geocaching.com) | |
| Horizontal rule | --- | |
| Header 01 | # Header 01 # | |
| Header 02 | ## Header 02 ## | |
| Statement / Title | ### statement / title ### | |
| Bullet points |
Bullet points * Geocacher |
Bullet points
|
| Numbered list |
Numbered list 1. Ammo can |
Markdown Smileys
| Emoji | Code | Result on web | Emoji | Code | Result on web | |
|---|---|---|---|---|---|---|
| Smiley | [:)] | 🙂 | Eightball | [8] | 🎱 | |
| Big Smile | [:D] | 😁 | Frown | [:(] | 😟 | |
| Cool | [8D] | 😎 | Shy | [8)] | 😌 | |
| Blush | [:I] | 🤭 | Angry | [:(!] | 😡 | |
| Tongue | [:P] | 😛 | Dead | [xx(] | 💀 | |
| Evil | [}:)] | 😈 | Sleepy | [|)] | 😴 | |
| Shocked | [:O] | 😮 | Kisses | [:X] | 😚 | |
| Wink | [;)] | 😉 | Approved | [^] | 👍 | |
| Clown | [:o)] | 🤡 | Disapprove | [V] | 👎 | |
| Hurt | [B)] | 🤕 | Question | [?] | ❔ |
4. Premium member features
4.1. Premium-only caches
Premium-only caches offer VIP access to thousands of additional geocaches all around the world. Cache owners decide if their geocache pages can be seen by all members or only by Premium members.
Search for Premium-only cache
Geocache search
On Geocaching.com, Premium-only caches have the tag PREMIUM. To search for Premium-only caches, select Premium in the filter options.
Pocket Query
When you create a Pocket Query, select Are for members only in the "That (And)" section. The Pocket Query will find Premium-only caches that meet the specifications that you indicate. Learn more about how to create a Pocket Query.
4.2. Worldwide search
Premium members have access to advanced features in the geocache search:
- No radius restrictions. Want to see all geocaches within 1000 miles, a country, or the whole world? Go for it!
- Save your search results as a List.
- Search for Mystery Caches that you’ve solved, but not yet found.
- Plan group outings with the ‘Not Found By’ search filter.
- Filter caches by name, cache owner, cache type, minimum Favorite points, attributes and more.
- Sort search results by Favorite points, size, difficulty, terrain, and when last found or placed.
Find out about popular searches.
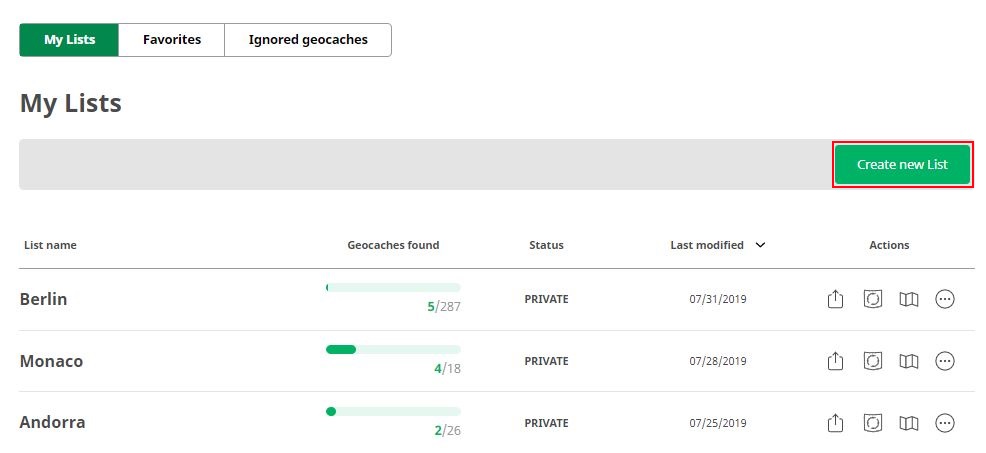
4.3. Lists
Premium members can create up to 100 Lists (maximum 1000 caches per List) to organize their geocaching adventures, or share their Lists with friends. Access your Lists from the left side of the new Dashboard or from the Play dropdown at the top of the screen.
Each List is available on both Geocaching.com and the Geocaching® app. Find out how to create Lists on the app.
Create a new List from the List hub page:
- Select Create new List
- Name the List
- Select Go to map or green plus
Create a List from the search page:

- Choose the caches you want to add to a List.
- Select Add # to a List from the top left.
- Choose to add caches to an existing List or create a new List.
Tip: You can also add individual caches from the Geocaching map or any cache page. Choose your cache, select Add to a List, then choose an existing List or create a new List.
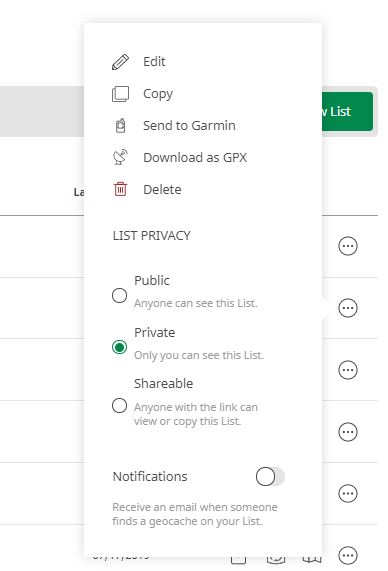
Manage your Lists from your List hub:
After creating a List you can choose to Share, Create Pocket Query, or Map List by selecting the corresponding button on the right.
For more options select either the name of the List to edit the content or the ellipsis (...) to copy the List, make it shareable, toggle Notifications, or download to your GPS
Favorites, Ignore List, and Watchlist
Select Favorites from the left side of your Dashboard to see a List of your favorited caches, or select the Favorites tab on the List hub page. To see your friends’ Favorited caches, select the List tab on their public profile.

Select Ignore from a cache page to add it to your Ignore List. Access your Ignore List from the Ignored geocaches tab of the List hub page.

Select Watch from a cache page or trackable details page to add it to your Watchlist, and you will receive an email notification for every log. Find out more about Watchlists.
4.4. Watchlists
This article is about Watchlists. To find out about how to create, manage and delete Lists, go here.
Your Watchlist lets you monitor multiple geocaches and
Tip: Cache owners do not need to use this feature because they automatically get notifications for their caches.
Watchlist privacy
Everyone can see how many geocachers are watching a cache page. For privacy reasons, however, we do not reveal the usernames of players who are watching.
Add something to your Watchlist
- Go to the cache or trackable page.
- Select Watch from the sidebar on the right.
View or delete your Watchlist
- On your Dashboard, select Watchlist from the
left hand side.
4.5. Instant Notifications
Want to keep up on all the new geocaches in your area? Want to keep an eye out for local Event Geocaches? With Instant Notifications, you can! This Geocaching Premium feature allows you to create up to 40 custom notifications to send to your email or phone.
Set up an Instant Notifications
- From the dashboard, select Setup notifications.
- Select Create a new notification.
- Select cache and log types.
- Set the location and radius (up to 80km/49.7 miles).
- Choose the email address where you want to receive notifications.
- Select Create Notification.
Tip: Select the log type Publish Listing to receive notifications for newly published caches.
Edit or delete an Instant Notifications
- Go to your Instant Notifications.
- Select Edit on the right.
- Modify the notification details.
- Scroll down and select Edit Notification to save your edits or Delete Notification.
Set up email-to-SMS
An SMS gateway allows your phone to receive email via SMS. Each mobile service providers has a different email-to-SMS address. Text messaging rates may apply.
To find the email address associated with your phone number, search online for "email-to-SMS" and the name of your mobile service provider. The address will typically include your phone number and the name of your provider: ##########@MobileCarrierName.com
4.6. Advanced maps
Premium members can use advanced map features and filter options for the following maps as shown in the table below.
Basic Member
Search map
- Geocaching map
- Google road map
- Google satellite map
Filter options:
- Search the world
- Cache type
- GeoTour caches
- My finds
- My hides
Browse map
- Leaflet maps
Filter options:
- Cache type
Geocaching® app
- Google maps
Premium Member
Search map
- Geocaching map
- Google road map
- Google satellite map
Filter options:
- Search the world
- Cache type
- GeoTour caches
- Difficulty and Terrain
- Cache size
- Attributes
- My finds
- My hides
- Corrected coordinates
- Placed date
- Name
- Cache owner
- Not found by
- Favorite points
Browse map
- Leaflet maps
- Google road/terrain map
- Google satellite map
Filter options:
- Cache types
- My finds
- My hides
- Save search as Pocket Query (Learn more about Pocket Queries)
Geocaching® app
- Google maps
- Trail maps (Learn more)
Filter options:
- Cache types, Adventure Lab® pins
- Difficulty and Terrain
- Cache size
- Attributes
- My finds
- My hides
Tip: You can get to the Browse map by using the toggle on the upper right corner of the Search map, or by using this URL.
4.7. Favorite points
Geocaching Favorite points are a simple way to track and share the geocaches that you enjoyed the most. Premium members can award Favorite points for
- Interesting or unusual locations.
- Cool hiding places.
- Creative cache container.
- Challenging Mystery Caches.
Geocachers can find the accumulated Favorite points of a cache in search results and on the cache page. Learn how to search for caches with a lot of Favorite points.
Earn Favorite points
Only Premium members earn Favorite points.
- One Favorite point just for being a Premium Member.
- One Favorite point for every 10 caches they find. (Adventure Lab finds, duplicate finds, and finds on your owned caches are not included.)
The fine print: If you found caches as a Basic member, you are prorated Favorite points the first time you become a Premium member. If your subscription lapses for any reason, you will not earn Favorite points until you renew your Premium membership, at which time the Favorite points will start accruing again at one Favorite point per 10 finds.
Award Favorite points
Award a Favorite point to exceptional caches when you log your “Find”. To award a Favorite point to a cache you have found in the past, follow these steps:
- Go to your Favorites List on Geocaching.com.
- Select the link to View your logs to apply Favorite points.
- Go to a cache page that you have logged as “found”.
- Select the drop down that shows the Favorite points.
- Select Add Favorite.
Event Caches cannot receive Favorite points. The goal of Favorite points is to recommend great caching experiences to others, it doesn't really make sense to spend a Favorite point on an event which has already taken place.
Archived caches keep their Favorite points unless a player chose to remove theirs. You can choose to remove a Favorite point from an archived geocache to award it to a new one. Visit your Favorites List to find out which of your Favorited caches are archived.
4.8. Create a Pocket Query
Premium Members can use the Pocket Query (PQ) feature to create a set of caches to download to GPS devices and the Geocaching® app. A PQ can include up to 1000 caches according to the filters you choose. The PQ will automatically download to the Geocaching® app and remains there for 7 days.
- You can create unlimited PQs.
- You can store up to 1000 PQs.
- You can generate up to 10 PQs downloads per day.
- Pocket Queries will only return active caches.
Tip: Premium Members can also create a Pocket Query from the map view.
Create a basic Pocket Query
To decide what is effective for you, start with a basic Pocket Query and see how it works before creating a more complex one. A common mistake is to check too many boxes so that you get no results at all.
Follow these steps to create a basic Pocket Query for caches near your home:
- Go to the Pocket Query page.
- Select Create Pocket Query
- Add in information to filter your search
- Choose My Home Location in the From Origin section.
- Select Submit Information at the bottom of the page.
- Read up on advanced options and filters to customize your PQ.
- Find the link to preview your PQ results at the top of the page.
Find your PQ in Your Pocket Queries. Edit it by clicking the name or delete it by selecting the checkbox on the left and selecting Delete Selected at the bottom of the list.
Tip: If you want to download your PQ results to your GPS, you must choose a day from the Days to Generate section.
Popular Pocket Queries
Geocaches published within the past 7 days
- Go to the Pocket Query page.
- Choose a day when you want to receive new results from the Days to Generate section.
- Choose My Home Location from the From Origin section.
- Choose a radius under Within a Radius of.
- Choose the last week from the Placed During section.
- Select Submit Information at the bottom of the page.
Wheelchair accessible geocaches
- Go to the Pocket Query page.
- Choose Terrain is equal to 1 from Terrain drop down.
- Choose My Home Location from the From Origin section.
- Under Attributes to Include, choose the Wheelchair accessible attribute.
- Select Submit Information at the bottom of the page.
My Finds
This special PQ returns all geocaches you found, including archived geocaches, and your log entries. My Finds does not include Lab Caches. Find your My Finds below your regular PQs on your Pocket Query page and select Add to Queue to run it.
4.9. Pocket Query filters
| Filter | Explanation |
|---|---|
| Query Name | Enter a name for the PQ so it is easy to identify later. |
| Days to Generate | On the day that you choose, we'll run your PQ and send you an email with a link to download your PQ results to your GPS device. If you run the PQ every week, we will send you an email with the updated results each week. Your Pocket Queries will show the date of the last update.
Pocket Queries are generated in Pacific Standard Time (PST). This may mean that your Monday is different from our Monday. |
| Caches Total | Enter the number (1 to 1000) of caches that you'd like receive. |
| Selected Types | Select the cache types to include in your query. |
| Selected Containers | Select the container types to include in your query. |
| That (And) | Select Is Enabled and other filter options to include in your query. Tip: Select Are for members only to search for Premium-only caches. |
| Difficulty and Terrain | Select the difficulty and terrain that you want to include. |
| Within | Select the country and state in which the query should run. |
| From Origin | Select the option that gives you the best center point of the area where you'd like to geocache. |
| Within a Radius of | Enter the radius of the area where you'd like to geocache. |
| Placed During | Select a time frame to include caches that were placed during that time frame. None Selected will give the most results. |
| Attributes to Include | Select the attributes to include in your query. Leave the options unchecked to receive the most results. |
| Attributes to Exclude | Select the attributes to exclude from your query. Leave the options unchecked to receive the most results. |
| Output To | Enter your email address and select the Format of your PQ.
|
4.10. Trip planner: Geocaches along a route
Make your next road trip more enjoyable by creating a custom route to find geocaches as you travel.
Create a new route
- On your routes page, select the Create New Route tab.
- Enter a route name and select Create Route.
- Enter a start and end point. A route can be up to 500 miles or 800 km long.
- Select Search to see your route.
- Drag the route on the map to include detours.
- Select Save Changes.
- Select Save Route.
Tip: You can enter a street address, state/province, country, or postal code as start and end points for your route.
Edit a route
From your routes page, select Your Created Routes to edit a route. You may edit the following properties:
- Route name
- Description
- Keywords
- To allow other geocachers to view your route, select Include in the Public Directory.
Add a route to a GPS device
- From your routes page, select Your Created Routes.
- Select Create Pocket Query of Route.
- Enter a Query Name (this can be different from Route Name).
- Use the Search Radius scale to choose the distance on either side of the route.
- Use the Show Me scale to choose how many geocaches you want to see on either side of the route.
- Choose your Pocket Query filter options.
- Select the email address and the format to receive your Pocket Query.
- Click Submit information.
- Use the link in the email to download the query results to your GPS device.